Wood slat ceilings and walls for camper vans and RVs
Vutha, founder & woodworker Updated Nov 3, 2026
Why van and RV builders choose ULTRALIGHT for ceilings and walls: 9mm thin, light, flexible and soft overhead. Plus how to install it on furring strips or plywood.
Yes. ULTRALIGHT is the panel van builders keep choosing for ceilings and walls, and it works the same way in an RV. It’s real wood veneer on 9mm of soft felt, so it saves headroom, it’s light enough to put up overhead, and it bends to follow the curve of the roof. The one rule: it goes onto plywood or furring strips, never straight onto bare metal.
Shown Ultralight White Oak, Black Felt7 min read
In this post
In this post7 min read
Why ULTRALIGHT works in a van
Most van ceilings start out tight, and every layer you add comes off your headroom: insulation, then furring strips or plywood, then the finished ceiling. Choose a thick ceiling and you feel it every time you stand up.
ULTRALIGHT is the thinnest layer in that stack. At 9mm it finishes the ceiling in real wood without taking the extra room that thicker boards or panels would.
It’s also light, flexible and soft overhead, which matters more in a van than in a house. Here’s why it works so well:
9mmEvery inch of headroom countsAt just 0.35″ thick, it takes almost nothing off your ceiling height. In a van, where an inch of headroom makes a real difference, that matters.
BendsIt flexes with the vanIt bends across the slats to follow the curve of the roof and upper walls, and it flexes with the van as it moves down the road.
SoftForgiving overheadThe face is real wood on soft felt, so it’s more forgiving than a hard plywood or wood ceiling when you stand up a little too fast.
CozyWarmer, quieter, calmerIt adds a layer of felt over your van’s insulation and softens the echo inside, so the cabin feels cozier and calmer than bare plywood or metal.
3 lbsLight enough to put up overheadThat’s one 8 ft panel, so it’s easy to hold in place and fix overhead.
KnifeNo saw neededULTRALIGHT Slat cuts with a sharp utility knife, so there’s no saw and no sawdust inside a small van.
A DIY creator and a van conversion company, both running ULTRALIGHT across their van ceilings.
Sam Raimondi, the woodworker behind DIY Huntress, put ULTRALIGHT on the ceiling of a van build. In the clip below she lifts a full-length panel over her head, holds it against the ceiling and fixes it in place. That’s the weight difference in practice: a panel light enough to hold up with your arms overhead while you drive the screws.
Holding a panel overhead and fixing it in place.
Sam’s take on the panels (sound on).
Partway through the build, Sam stops to share her take on the panels on camera. It’s her honest opinion, in her own words.
How she finished the edges with trim (sound on).
Every ceiling needs a clean edge where the panels stop, at the walls, cabinets and vents. Sam walks through the thin wood trim she used to finish those edges, so the cut ends and felt are covered and the ceiling looks built-in.
Never fix ULTRALIGHT straight onto bare metal or onto insulation. It needs a hard surface behind it: furring strips, plywood, or another solid substrate.
Option 1: furring strips
Fix wooden furring strips across the van, side to side, 16″ on center. Then run the panels front to back, so they cross the strips at right angles. The 16″ spacing is what stops the panels sagging between supports.
Seen from above: strips across the van, panels front to back, cut around the roof fan and lights.
Fix the strips. Screw the strips to the van’s roof ribs, across the width of the van, 16″ on center. Check they sit flat and in line, because the panels follow them.
Plan the layout. Measure the ceiling width and work out how many panels sit across it (each is 11.80″ wide). Mark where vents, lights and the roof fan go.
Fix the panels. Run each panel front to back and screw through the felt groove between two slats into every strip it crosses, using trim-head screws. Use screws short enough that they can’t go past the strip into the roof.
Join the next panel. Butt the next panel up to it: the half-grooves at each edge close into one full groove, so the join looks like every other line.
VuthaFrom the workshop
Use trim-head screws. The small head sinks into the felt between the slats, so once the panel is up you can hardly find them. On black felt, a dab of black permanent marker on each screw head makes it disappear completely.
Mid-install: furring strips across the van over the insulation, panels running front to back across them.
Option 2: plywood backing
If your walls or ceiling are already lined with plywood, fix ULTRALIGHT straight onto it with construction adhesive, screws through the felt groove, or both.
On plywood: press each panel into the adhesive, then work along the wall and around the window.
Cutting and fitting
ULTRALIGHT Slat cuts with a sharp utility knife, so there’s no saw dust in a small space. Run painter’s tape along the cut line first to keep the veneer edge clean, and cut openings for windows, vents and lights with the panel face up. The full steps are in the ULTRALIGHT install guide.
VuthaFrom the workshop
Keep your offcuts. A strip cut from a spare panel makes the best trim there is: same wood, same finish, so it covers a seam or a cut edge where the ceiling meets a wall or a cabinet and matches perfectly.
Pick your finish
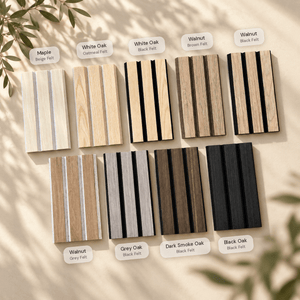
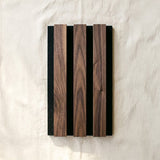
Every finish is the same thin, light panel. Lighter finishes keep a small space feeling open; darker ones feel snug and cabin-like. The felt shows in every groove, so pick the wood and the felt together. Here’s every ULTRALIGHT Slat combination:
Order samples and hold them up inside the van in daylight and under your own lights at night. Wood looks different in every light.
In a van, the ceiling is the biggest surface you see, so the finish sets the mood of the whole space. Here Sam talks about the wood tone she chose and the warmth it brings to the van.
Sam on the color and the warmth it brings to her van (sound on).
The view from the bed: ULTRALIGHT White Oak, cut neatly around the roof vent.
How many boxes for a van?
The panels run front to back, so count across the ceiling first, then along it:
Panels along: most van ceilings are longer than one panel, so each row takes a full panel plus a cut piece. One spare panel gives you the cut pieces for several rows, so the joins land in different places.
Boxes: total panels ÷ 5, rounded up. Every box holds five panels of one length.
Here’s that math done for the three most popular van platforms: 6 panels across a Transit or Sprinter, 7 across a ProMaster. Roof height doesn’t change the count, because a high roof is taller, not wider or longer. Numbers are boxes of each panel length.
Van (wheelbase)
Ceiling (L × W)
8 ft
9 ft
10 ft
Ford Transit 130″
126″ × 70″
2
2
2
Ford Transit 148″
144″ × 70″
3
2
2
Ford Transit 148″ extended
172″ × 70″
3
3
2
Mercedes Sprinter 144″
133″ × 70″
2
2
2
Mercedes Sprinter 170″
174″ × 70″
3
3
2
Mercedes Sprinter 170″ extended
189″ × 70″
3
3
3
Ram ProMaster 118″
105″ × 76″
2
2
2
Ram ProMaster 136″
123″ × 76″
3
2
2
Ram ProMaster 159″
146″ × 76″
3
3
2
Ram ProMaster 159″ extended
160″ × 76″
3
3
3
Ford Transit 130″126″ × 70″
8 ft29 ft210 ft2
Ford Transit 148″144″ × 70″
8 ft39 ft210 ft2
Ford Transit 148″ extended172″ × 70″
8 ft39 ft310 ft2
Mercedes Sprinter 144″133″ × 70″
8 ft29 ft210 ft2
Mercedes Sprinter 170″174″ × 70″
8 ft39 ft310 ft2
Mercedes Sprinter 170″ extended189″ × 70″
8 ft39 ft310 ft3
Ram ProMaster 118″105″ × 76″
8 ft29 ft210 ft2
Ram ProMaster 136″123″ × 76″
8 ft39 ft210 ft2
Ram ProMaster 159″146″ × 76″
8 ft39 ft310 ft2
Ram ProMaster 159″ extended160″ × 76″
8 ft39 ft310 ft3
Good to know: these counts use each van’s cargo length and widest interior width, from Ford, Mercedes-Benz and Ram’s published dimensions, and each count leaves you at least one spare panel. Your build may differ (a ceiling that runs over the cab, or panels carried down the curved upper walls), so measure your own van before you order.
Which length? 8 and 9 ft panels always ship free by parcel. 10 ft panels mean fewer joins, and on some vans one box fewer; they ship by freight, with free delivery on 4 or more boxes.
Near Orange County? Pick up any order with no shipping cost from 12714 Hoover St, Garden Grove, CA 92841, 9am to 5pm. Give us 24 hours’ notice so it’s ready. A 10 ft box is about 10 feet long, so bring the van.
Planning a build? Shop ULTRALIGHT, or ask us about your van. A real person writes back.
Frequently asked questions
Are people using ULTRALIGHT on camper van ceilings?
Yes, a lot of them. We see a lot of van builds using ULTRALIGHT, mostly for the headroom, the light weight and the way it follows the curve of the roof.
Can I use it in an RV or travel trailer?
Yes, as long as it goes onto a hard surface, the same rule as a van. Most RV and trailer walls are thin plywood, so fix it with construction adhesive rather than screws alone, since short screws won’t hold in thin wall panels. For ceilings, fix it to the roof framing or furring strips.
I want to avoid MDF in my camper. Is ULTRALIGHT MDF?
No. It’s real wood veneer laminated onto recycled felt, with no MDF or wood core behind it.
Can I put LED strips in the grooves?
We’re working on an LED strip made to sit in the ULTRALIGHT V-groove. Standard strips don’t fit the groove’s shape well, so it’s worth waiting for ours.
Can I glue it straight onto the van’s metal?
No. Fix furring strips (16″ on center, across the panels) or plywood first, and fix the panels to that.
Does it insulate the van?
It isn’t an insulation product and has no insulation rating. It adds a layer of felt over your insulation and softens echo inside, which helps the van feel cozier and quieter.
Is it waterproof?
No. Keep it away from direct water, so not inside a shower or right beside a sink splash.
Is it fire rated?
No. Our panels are not fire rated. If a fire rating is required for your project, check with your contractor or your local building code before ordering.
Written by Vutha, founder of Slats.co
A woodworker who built his first slat wall by hand, then started making panels so you don't have to. Our story →
Last updated November 2026. Questions? Ask us, a real person writes back.









 Ultralight
 TrueWood Lite
 Solid Oak & Walnut
 Solid Bamboo
 Paint-Ready


